Your new best friend: 100-150 grit sandpaper.
Your old best friend: Your manicure (seriously, wear gloves).
I believe in giving credit where credit is due. Before embarking on this project, I looked a bit online and found Diane’s tips on “in my own style” valuable. I’m using the tools and techniques she suggested.
About the table:
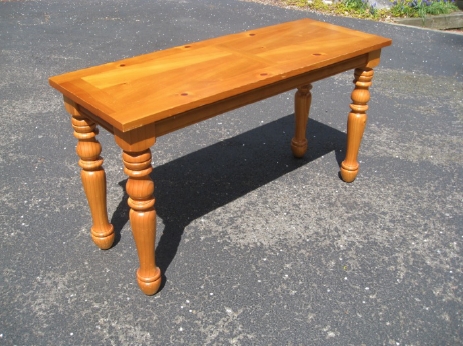
$72 pine console table purchased fourteen years ago. Pine furniture is loved for the characteristic knots by some and for the inexpensive price tags by others, like me. Pine, like most wood, changes color over time. We planned this table for our new kitchen project and, as much as I loved the size and design of the table, I knew the color of the wood just wasn’t going to work once the kitchen was complete.
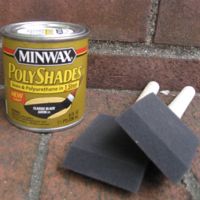 For this table, roughly fifty inches wide by twenty-seven inches by sixteen inches deep, I purchased the eight ounce Minwax stain and two foam brushes to make clean-up easy. I used almost half of the can for a two-coat application. This oil-based opaque stain has a sheer look which won’t look heavy or hide details on your furniture.
Sand the furniture piece thoroughly. Never underestimate the importance of prep in a project like this. Sure, you’re eager to see the finished results, but you’re more likely to get the finished result you desire if you spend the time to sand all of the surfaces well for best adhesion. Towel off the excess debris with a soft cloth.
Save yourself the heartache and finish the top last. Whether you’re 26 or 66, after squatting to paint the legs and lower details you WILL use the table to hoist yourself to a standing position.
The opaque oil-based stain is much thinner than paint, so it will drip. Apply the stain in thin coats and check for drips as you go to eliminate unsightly drips or puddles of stain. The first coat may disappoint with a thin application, but you’ll see results after the second coat.
If bubbles or gaps in the color appear as it dries, no worries, simply sand the finish lightly and dust away debris before applying the next coat. You’ll want to lightly sand the top again before applying the second coat to make sure the surface is evenly covered since it is the most visible. Two coats did the job for this table.
If you can work outdoors, it will dry quickly and you will not be overwhelmed with the fumes from the stain. Try to work in an area free of falling tree debris and insects. A little black and white spider is a permanent part of this table now.
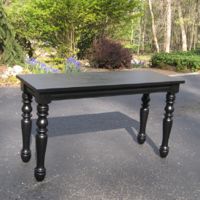 The look I wanted wasn’t a slicked black lacquer, but a sheer black wash over the wood with some of the wood color showing through in the details of the piece—sort of like antiqued furniture but with less color variation. If you’re too young to remember antiqued finish on furniture, ask your mother or your hippie aunt. It was all the rage through the 1970s.
The “after” photo should look something like a piece from an Ethan Allen commercial. At least, that was my hope when I started.
Source: Barbara Goodspeed lives in Cascade, Michigan and has more than twenty years experience in commercial, retail, and healthcare design. Barbara is a consultant for Allard Design LLC in Spring Lake, Michigan.